How I deployed my website: A step-by-step guide
— how-to, domain-hosting, web-hosting — 2 min read
Just a step-by-step guide on how I made my website live on the internet.
1. Buy a domain
Depending on your desired domain, there are a lot of domain hosting like Google Domains, AWS Route 53, GoDaddy, etc.
I bought my .dev domain at Google Domains.
2. Build your website
I don't want to build my website from scratch and I am a backend developer so front-end is not my forte. To build this website I used Gatsby and the gatsby-starter-minimal-blog.
It's simple and minimalist! Thank you LekoArts!
3. Deploy your website
To host my website, I just signed up for AWS Free Tier and ran a t2.micro instance with httpd installed on it.
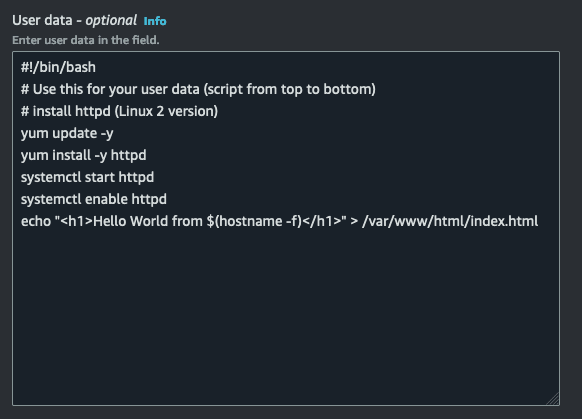
When I launched my ec2 instance, I just added these commands on the User data field that will be executed when the instance is started.
When your instance is started, you should be able to view the Hello World from your ec2 public IP.
To deploy my website, I ran a gatsby build command locally then rsync the whole contents of the public directory of my gatsby project.
cd gastby-bloggatsby buildrsync -auvrzP -e "ssh -i <ssh key pair>" public/* ec2-user@1.2.3.4:/home/ec2-user/gatsby-blog/On my ec2 instance, I just copied the whole contents of the rsynched files to /var/www/html/ directory then restarted httpd.
sudo cp -r gatsby-blog/* /var/www/html/sudo systemctl restart httpd4. Redirect you webserver IP to your domain
On Google Domains, I just added 2 DNS records on my domain that will redirect to the public ip of my ec2 instance.

5. Enable HTTPS!
To install certbot and configure SSL/TLS, I just followed the instruction on the link below
https://docs.aws.amazon.com/AWSEC2/latest/UserGuide/SSL-on-amazon-linux-2.html#letsencrypt